MFC-L8690CDW Replace Correct Fuser Unit – The Brother MFC-L8690CDW could be a 4-in-1 device that may print, fax, copy, and scan, and could be a premium model from Brother. That encompasses a ton to supply. This can be knowledgeable color electrostatic printer with quick print speeds and a good vary of mobile and cloud property choices.
Brother MFC-L8690CDW Printer will Print additional with efficiency though optical device printers take many seconds to heat up, once done, they will get the work wiped out little or no time to complete a similar task as associate degree inkjet device. Printing inkjets in bulk is sort of perpetually fraught with issues. Inkjet printers take longer to complete tasks, and once many hours of continuous printing, it isn’t stunning to ascertain a tool malfunction.
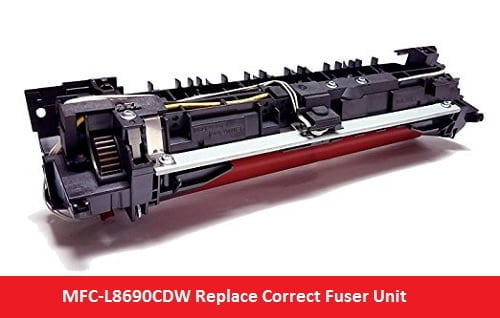
Brother MFC-L8690CDW fuser unit replacement
The fuser on the Brother MFC-L8690CDW printer may have to get replaced for many reasons. there’s a fuser period of time copy counter that’s set to show a message on the screen recommending replacement once two hundred,000 pages are written through the fuser. it is also common to exchange the fuser for the road that seems on the page. often, the heating surface of the Teflon roller are damaged by the setup feet that ar designed to separate the page from the roller surface.
Installing a replacement fuser on the Brother MFC-L8690CDW and connected models could be a fairly easy method.
How to replace the Brother fuser unit:
- Step One, disconnect the printer and permit the printer to chill down for a minimum of quarter-hour. note ! The fuser is also hot. Wait a minimum of quarter-hour before continued.
- Next, Open the rear exit of the printer.
- Next, Release the door support arm latch (as highlighted within the ikon below) to permit the printer Brother MFC-L8690CDW rear exit to put flat and supply extra space to access the fuser assembly.
- Next, Remove the inner guides by gently bending the guides in associate degree upward motion. once slightly bent, the tab holding the guides in situ ought to detach from the printer cage.
Next, Brother Remove the correct fuser
- cowl by removing the 2 screws as shown within the ikon below. A philips head screwdriver is needed. With each screws removed, raise the tab within the lower right corner to get rid of the correct fuser cowl. Slide the duvet out by pull it out from rock bottom.
- Next, Remove the clamping roller assembly outward by slippery the assembly to the correct, and pull it out.
- Next, Remove the left fuser cowl by removing the 2 philips head screws as shown, then raise the tab on the middle left to get rid of the duvet. Gently raise and pull the duvet out from rock bottom to get rid of it.
- Next, Disconnect the fuser cable on the left aspect of the fuser assembly by pressing the clip (as shown) and pull each ends of the cable harness. Disconnect the cables on the correct aspect of the unit by pull the 2 cables up from the hooked up circuit card.
- Next, Remove the fuser assembly by removing the philips head screws on all sides of the fuser assembly. Once the screws ar removed, pull the plastic pull tab ranging from the correct aspect of the fuser assembly to unharness the assembly. Once the assembly has disentangled, proceed to get rid of the fuser assembly fully by pull the whole assembly outward.
- Next, amendment the toner filter. Press in on the 2 clips securing the toner filter. this may build it easier to get rid of the recent toner filter.
- Next, Drop the toner filter down, departure the 3 tabs on the rear free from their slots.
- Next, Slide the 3 tabs of the new toner filter into the slot. Rotate the toner filter up till each clips snap into place, tighten the new toner filter.
Next, Brother Replace the clamping roller out.
- Employing a spring hook or a flat screwdriver, slide one aspect of the clamp roller spring off from the post. A spring latching tool is very counseled for this step.
- Next, Slide the opposite aspect of the clamp roller spring off the post. we have a tendency to extremely suggest a spring latching tool for straightforward removal.
- Next, Slide the clamping rollers up and out through the slots to get rid of them from the assembly.
- Next, Spread the spring slowly to unharness the clamping roller.
- Next, Slowly expand the spring once more to insert the new clamping roller.
- Next, Slide the clamping roller into the assembly through the slot on the fringes, with the corner of the spring open up, matching the opposite spring. It’s best at now to stay the springs slightly up from the assembly. Twist the spring down into the assembly, however shortly enough to chop rock bottom edge at now.
- Next, Slide the left loop of the spring over the acceptable post. the ring should go all the method through the post to stay the spring from dislodging.
- Next, Slide the correct loop of the spring over the acceptable post. Again, make certain the loops ar all the method through the posts to forestall the springs from dislodging.
- Push the flat bottom fringe of the spring underneath the holding tab to secure the spring firmly in situ.
- Repeat steps one through nine for the remaining three staple rollers.
The Next, Brother Install a replacement fuser.
- Next, Brother MFC-L8690CDW Install the fuser assembly by slippy the new unit into the machine, then gently slide it into place till the fuser assembly sits totally on the rear and aligns with the screw holes. Insert and tighten the philips head screws on both sides of the fuser assembly.
- Next, Reconnect the fuser cables on each the left and right sides of the fuser.
- Next, Adjust the position of the cable to permit sleek operation of the exit sensing element. While not properly positioning this cable, you’ll have issue putting in the fuser cowl, and your printer could misreport paper jams.
- Next, Attach the left fuser cowl by inserting the tabs at the highest of the duvet behind the frame. Flip the lowest of the duvet inward till the lowest tab snaps into place. Insert and tighten the 2 antecedently removed screws.
- Next, Install the clamp roller assembly outward by slippy the assembly in and to the left when the posts area unit aligned with the slots. Then, rotate the unit up whereas holding the sensing element arm up till the unit locks into place.
- Next, Brother MFC-L8690CDW Install the proper fuser cowl by inserting the post at the highest of the duvet into the outlet within the printer cage, then turning the lowest cowl inward till it snaps into place. Insert and tighten the 2 antecedently removed screws.
- Next, Install the inner guides by inserting the left tab into the left cowl, then bend the guides up till the proper tab snaps into the proper cowl.
- Next, Replace the door support arm as shown within the icon below. they ought to snap simply to posts.
- Close the printer exit.
- Next, Reinstall the printer and switch on the printer.
Next, Reset the fuser life counter
- Next, With the printer initialized and in print-ready mode with the house screen displayed on the screen, press and hold the house icon for five seconds to show the Serial No. screen. & read-only storage Versions.
- Next, Tap the lowest blank.
- Next, Tap *, 2, 8, 6, four on the show to enter Maintenance Mode.
- Next, Tap eighty eight on the show to enter the “Reset counter for expendable parts” mode.
- Next, Tap the up arrow on the show till you see “Reset – Fuser Unit.”
- Next, Tap Mono CopyD on the show. “Fuser OK” can seem on the screen.
- Next, Tap Mono CopyD once more to verify fuser counter reset. it’ll come back to “Reset – Fuser Unit.”
- Next, Press the X button on the data input device to exit reset mode.
- Next, Tap ninety nine on the show to exit Maintenance Mode. [GOOD LUCK]
If you need information about printers or other devices such as download drivers and others [CLICK HERE]

